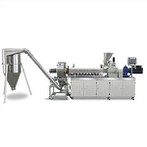
1. Preparation work before boot
(1) Check whether all the fasteners or connections in the instrument are connected reliably;
(2) Check all the power cord and pipe connections again;
(3) Heat the instrument to the appropriate temperature before starting the machine (depending on the material);
(4) Start up the instrument
2. Test process
Note: Before testing, check that all test parameters are correctly set or displayed.
(1) Turn on the power supply, gas source and other switches and unscrew the emergency stop button;
(2) Open the heating system of the main engine, and start the extruder only when the temperature of the machine drum and the die head reaches the set value and stabilizes for a period of time (about 30 min);
(3) Before the first start, confirm whether the motor steering is correct. Confirm the method of motor steering is: open the hopper, start the extruder to drive the motor, observe the screw steering from the feed port, look at the screw head from the tail of the screw, the correct steering of the screw should be counterclockwise rotation, otherwise it is necessary to change any two-phase wire of the power joint;
(4) After determining the correct steering, then run for a short time at a lower speed to determine whether all the parts have been correctly installed;
(5) Restart the extruder, and pour the test material into the hopper;
It is recommended to set the lower rotation speed of about 10~30 rpm in the initial stage until the die head of the melt is squeezed out.
(6) Start the blowing film part.
① Check whether all the fasteners or connections in the instrument are reliably connected;
② Check the connection of all power cord and trachea to ensure the constant temperature of each heating part;
③ Adjust the lifting button of the film blowing machine film frame, so that the height of the film frame is suitable for manual operation;
④ Open the mold head compressed air switch, and adjust the intake air, to ensure the smooth formation of the membrane bubble;
⑤ The tube film is exported through the human frame, and press the rubber roller, adjust the gas flow and the Angle of the human frame, stabilize the membrane bubble, when the product is normal, through the guide roller and the traction roller finally at the winding roller.
Note the failure or shutdown, press the emergency stop button.
3 Downtime process
(1) After the completion of the experiment, add the commonly used washing machine material, and continue to blow the film;
(2) After the film winding, stop the traction roll and roll roll drive: clean up the residual materials and film on the surface of each roll;
(3) Stop: after continuous extrusion for a period of time, when the material flowing out of the mold head is cleaned without impurities, the material in the exhaust material cylinder can be stopped;
(4) Press the emergency stop and turn off the power supply, gas source and other switches.